TLS Softphones installation guide
TLS softphone – download and setup.
- Blink – Windows XP, Vista and 7 – Download Blink
- Blink – Linux, Debian and Ubuntu – Download Blink
- Blink – MacOSX – Download Blink
Sample Installation and configurations for Blink Softphone.
Once the installation is done, open the software. Double click and follow the installation instructions
Once the installation is done, open the software. Double click and follow the installation instructions
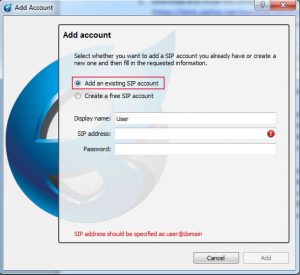
1. Add account setup:
- Select “Add an existing SIP account”
- Display name = whatever name you like.
- SIP address = your extension number, @, SIP server. i.e. 5555555@173.203.80.182
- Password = the password provided you with the extension.
- Click on “Add” button.

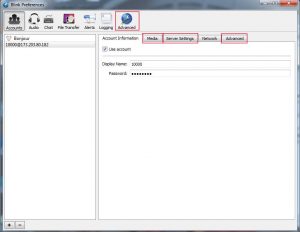
2. Edit account to use TLS and SRTP:
- Click on the top bar Blink -> Account -> Manage accounts
- Click on “Media” tab and change “sRTP encryption” to use “mandatory”.
- Click on “Server Settings” tab and on “Outbound Proxy” type the server IP (173.203.80.182), change the “Port” to 5061 and the “Transport” is TLS.
- Click on “Advanced tab”, press “Browse” under “Certificate File”. locate the “*.pem” file you received from your local computer, mark it and click “Open”.
- On the above tabs there are another “Advanced” tab, there you will see “TLS Settings”, click on “Browse” and locate the “ca.crt” file from your local computer, mark it and click “Open”.

Close the settings window and the extension is ready to use.